Sunday, June 28, 2015

Christmas Gifts - Working Ahead!

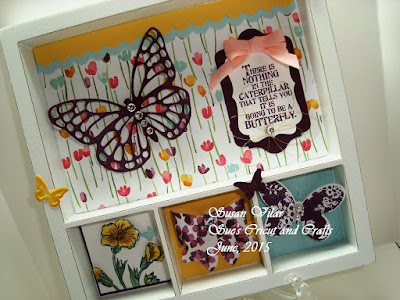
One of the ladies from my stamp club brought this project to show us, and I fell in LOVE!  I took a picture that evening, and then went on a search.  Thanks so much, Sandra!

The next day I went to all 3 Michael's in our area looking for these trays.  I struck out, but it was a fun day out shopping! When I got home, I then ordered them online. (Stay tuned for a link below.)

 Again, this project uses the DSP Painted Blooms.  Each time I use it I'm more in love with it.

 This detail I added from the original.  It's the new Metallic Thread.  Once you get over the (very small) learning curve, this is a great detail to add to cards/projects!
I really love this saying.

 When I'm finished with the 2 other shadow boxes I'm expecting, there will be a total of 9. This project didn't take that long, but when I really looked at it, there was a LOT of detail!

Lots of die cuts:  the sentiment background, and the 2 butterflies.
Lots of punching:  The sentiment, top scallops, and the bow which uses lots of glue dots.
Embossing:  New butterfly folder on the Soft Sky cs.
Paper tole technique on the flower for depth.
Metallic Thread flower under the rhinestone.
Double bow with the bow maker my Dad made for me!
Embosslits to cut the small butterflies.
Stickles and Crystal Effects on the flower.

Source for the Shadow Trays:  http://shop.canvascorpbrands.com/
This is the specific link for this Shadow Box/Tray: http://shop.canvascorpbrands.com/products/solo-tray-white.


 photo enjoybermudabay.jpg

Friday, June 26, 2015

Dress Cards - Happy Birthday!

Again this is the Painted Blooms DSP.  There are just so many pretty patterns in this Designer Paper!

I have 2 wonderful friends that craft with me.  When we can, we get together once a week to work on whatever project we've got going.  It's a great time to connect with friends, and I enjoy making snacks to share.  I like to try new recipes, and it's even more fun to share them.

 My friend saw one of the dress Christmas cards I made last year, and requested it.  The problem with that was that once I sign and seal them during the year, I don't remember which card is which! 
 SO, with her birthday in June, and this beautiful paper, I made some dresses! 
Happy Birthday, my dear friend!  :)


 photo enjoybermudabay.jpg

Wednesday, June 24, 2015

Butterflies..... Again!

The stamp set Butterfly Basics debuted in the Occasions 2015 catalog.

As a 'sucker' for anything butterflies, I purchased it immediately!  This stamp set makes adorable cards, and can be used for so many things (stay tuned)!

I stamped the butterfly twice.  Once on the card background, then on another piece to die-cut it, and mounted it to give it a shadow.
I particularly like the sentiment.  "There is nothing in the caterpillar that tells you it is going to be a butterfly."

I strongly believe this can be used for children.  Here you have this little kid...  a good kid or not (I've known many) and you never know how they'll turn out as adults.  Homelife, their experiences, their personality (positive or negative); these things all depend on how they grow.  Sometimes you can see it when they're children, but often you cannot.

There's my deep thought for the month! 


 photo enjoybermudabay.jpg

Sunday, June 21, 2015

June 2015 Christmas Cards


I was going through my Kitchen Sink stamps looking for something, and found this hot chocolate mug!

I LOVE hot chocolate and have it occasionally when it's cold, but have switched to hot tea because I can drink so much more of it and switch to decaf/herbal tea when it gets later in the evenings.

This turned out to be an adorable set of Christmas cards...  I used Tsukeniko inks for the mug and went back to my regular Stampin' Up inks for the sentiments on the front and inside of the card.
 I used 2 of the Brilliance inks and if you look very closely, you can see the white froth glimmers in the light.
My dear friend Melissa was over the day I made these.  We had lots of fun deciding colors, and watching the layers appear.

January:  6 cards
February:  6 cards
March:  6 cards
April:  6 cards.
May:  5 cards
June:  6 cards
Total:  35 Christmas cards!


 photo enjoybermudabay.jpg

Saturday, June 20, 2015

Niece's Birthday Card


My recent fascination with the spinner cards led to this Birthday card for our niece.
She's a crafter as well, just starting out.  I knew she's really appreciate this card.

I used my 3 favorite happy colors - Bermuda Bay, Daffodil Delight, and Melon Mambo.  Together, they just make me happy!  That was the idea for the birthday card!  :)

I took a video of the card, but didn't take a still picture!  RRRrrrrr   so here's a video clip. 


 photo enjoybermudabay.jpg

Friday, June 19, 2015

Painted Blooms with a Mother's Day slant!

After showing the original 6 cards I made at my club, then everyone got together to make them!
My little class of 5 or 6 people (which I was VERY happy with) turned into 19 for our club groups!

WOW!

I was asked to make some cards with a Mother's Day bent since it was close to that time.  I have such a narrow view of Mother's Day...but some of the ladies at the class said they give 4 or 5 Mother's Day gifts each year!  Very extended families, I guess!

 Here are some of the samples I brought along for the group to use as inspiration.


 photo enjoybermudabay.jpg

Thursday, June 18, 2015

More Painted Blooms

At the card class I gave, we made 8 cards, so each attendee had a choice of 2 more cards from the following selection.

The first one looks complicated, but it really isn't.  The most difficult thing was putting the bow together, and that's just fun - and lots of glue dots!!


I love all the cards, but this last one uses the strip you cut off to make the One-Sheet Wonders posted 2 days ago, so there was no waste! :)


 photo enjoybermudabay.jpg

Wednesday, June 17, 2015

Birthday Card for my Dear Friend

Happy Birthday, Melissa!

We've been playing with these spinner cards for awhile now...  actually less than a month, but it seems longer because I've now made 4 or 5 of them.

It takes a little engineering, but they're SO FUN, and Ms. Kathy challenged us, and I always LOVE a challenge!
This butterfly spins all the way around the cut-out circle.  I didn't want the background to be plain, so I used the same honeycomb stamp on the background to blend the two levels of card stock.

Here's the short video clip I took of this card so you could see the motion of the spinner cards.  Fun,  Fun, FUN!! 


 photo enjoybermudabay.jpg

Tuesday, June 16, 2015

Painted Blooms DSP One Sheet Wonders

When I first saw this paper, I fell in LOVE LOVE LOVE!

As I've said before,  I went back to the classroom full time, and it really put a CRAMP in my crafting time! That said, when I saw this paper, I really wanted to have a class and let others learn how amazing this paper is!

I don't do many classes...  this was my 2nd one, I believe.  Maybe it was the third.  I can't remember, it's been so long! 

 The story behind this Designer Series Paper is that this sheet was painted by a designer, and then used as 2 of the sheets in our 12x12 paper pack.

There was a tutorial on Pinterest, and I thought this would be a wonderful class for card-makers of all levels.
Above, I put the cards back in the same order as the original sheet.
Below you can see all 6 cards made with this one sheet of paper with some additions and embellishments.


More in the next post using other sheets from the DSP pack.


 photo enjoybermudabay.jpg

Monday, June 15, 2015

May 2015 Christmas Cards


I rarely use these two stamp sets.  This idea just came to me one afternoon when I saw these ornament stamps in my stash. (I use the word stash as my crafting stuff.  I believe most crafters/quilters/artists use this term.  I found out that 'stash' doesn't mean the same to everyone this school year.  :)  Lesson learned.)

That said,  I stamped the Post Card background in Garden Green, and the ornaments in Cherry Cobbler ink.  After some sleight of hand, I got it to work beautifully.
 I'm not sure what happened, but when I got this all finished, I had only 5.  One month I'll make 7 to catch up.

Please enjoy!

January:  6 cards
February:  6 cards
March:  6 cards
April:  6 cards.
May:  5 cards
Total:  29 Christmas cards!  YAY!  :)


 photo enjoybermudabay.jpg