Monday, October 28, 2013

Wedding Dress Form

Stampin' Up has Dress Form framelits.  They are metal dies in 3 shapes,  an elegant dress, a day dress, and a dress form to hang the dress from.

At first I wasn't a big fan of these, but after seeing so many beautiful dress cards made for many different occasions, I got the set.  This is my 2nd paper dress.

One of my co-workers was married last weekend.  She's a crafter too - more painting, and 3D art, but she appreciates my cards and projects too.  I went over to her place a few weeks ago to help get some of her wedding projects done for her fall themed wedding.  It was a GREAT afternoon, and they were beautiful wreaths.

 Using the dress form as a base in black,  I cut the dress and embossed it, and folded one of the SU doilies 3 or 4 times to make a ruffly lace skirt.  I added pearls for the choker, and around the waistline.

One thing I meant to do and didn't was to emboss the entire background in silver with the En Francais stamp.  It completely slipped my mind - I think it would have been an amazing background.  Next time.

This is the inside of the card - and I made sure to cover my smudge (oops) from inking the sentiment with writing.  I know you're thinking.... a brown (soft suede) card base for a wedding card?  It totally worked with the theme of her wedding...  fall colors, leaves, and she didn't want anything too white, except her dress.

I presented the card today, and my friend really loved it.  Now I can't wait to see all the pictures from her amazing day.


Saturday, October 26, 2013

2013 Christmas Cards - October

Late September and early October were really hectic around here!  Lots of in-laws drama (which I don't partake of), and things going on at work.... it was enough to even get to work much less craft.

After our Stamp Camp weekend I was more energized and had some projects to get moving on.  It was the perfect time to get caught up on my Christmas Cards!


As always, I made 6 for the monthly goal - with one of my favorite stamp sets, Watercolor Winter.  I kept everything red with just the Old Olive green on the holly for an addition of color.
 Here you can see the inside sentiment and the envelope.  Remember, "No naked envelopes!"

This Triple-Double stamp technique is one of my go-to favorites....  Triple Time Stamping with a Two step stamping set.  Quick, easy, and really beautiful!

Three colors in the entire set of cards.  Cherry Cobbler, Whisper White, and Old Olive.

Please enjoy!


Thursday, October 24, 2013

Happy Fall - Y'all!

Sorry about that, I just had to do it!

I CASE'd this card from a Stampin' Up Demonstrator.  I made just a few changes, and if I make more of these (there are 5 in all so far), I'm going to make a few more changes.


I realized I should have stamped the leaves as though they were falling... AFTER I had all the panels stamped, of course.  Next time I'll make that change.

Colors on this card:  Chocolate Chip, Very Vanilla, Old Olive, Cajun Craze, and Crushed Curry.


Tuesday, October 22, 2013

Nephew's Card

My youngest nephew is currently in Basic Training for the Air Force.  The entire family has been sending him cards, letters, newspaper clippings, etc. etc. etc.

This is the third card I've sent his way.  The other two were very plain - nothing too fancy.

This one - I decided to spice it up a bit since he's going to finish soon, and move on to his next assignment.


Lots of details, Washi tape, banners, stars, embossing, Stickles...

Please enjoy!


Saturday, October 12, 2013

Stamp Camp 2013 Part 3 My Finished Projects

This post shows the projects I completed from our Stamp Camp last weekend.

I actually didn't get to finish this one there... just ran out of time.  I had to go home to sleep, so I brought this one home and finished it Sunday afternoon.  The only thing I brought with me were the tag pieces, the wires, and blocks.  I had the Christmas paper (one of my favorites...).

 It's actually a set of 6 blocks, Ho, Ho, Ho!  I'm sending this along for my sister so she can display some of her pictures when the boys were little - sitting on Santa's lap.

The next two pictures are the letters I made.  The S is for Mom and Dad, and can be hung in the kitchen - it will match the colors nicely.

This one I made for me - I loved the crosses in the black and vanilla.  This is already hanging in my craft room.  Love it!

I'll make some more of these for Christmas, but definitely need to find a solution for attaching the hanging hooks.  :)

The next two projects are perfect stocking stuffers!  Lip Balm holders!  They open up to a "to and from" message you can write on, and a lip balm inside each one.  VERY cute projects!


I really hope you can see all the detail in this frame - each approximately 2 inch square is embossed with a different folder - then mounted and embellished with red and green details.  I took some extra time with this, and I'm SO happy it turned out beautifully!  No sure yet to whom this will be gifted.


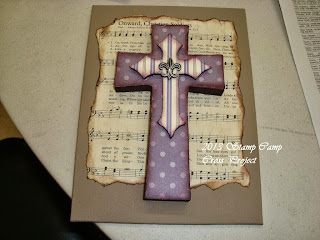
This is my version of the Cross Project.  I had to pick a Christmas Hymn (my favorite holiday), and wanted a lighter background.  I chose paper from the Morning Mocha stack, and if you look closely, you can see the gold shimmer in some of the paper details.  It works perfectly with our living room furniture, and will hang in our living room permanently.

This last project was actually a necklace, but I wanted it to be just a heart, so I didn't mount in on the jewelry.  We shaped the clay, and allowed at least 6 hours for it to dry.  We then stamped on it, used Crystal Effects to make it shine, and mounted the rhinestones.    Such a cute project!

Thursday, October 10, 2013

Stamp Camp 2013 Part 2

This year's Stamp Camp, I did most of the projects, so I didn't take too many candid shots of the ladies working - just this one.

 Kathy does a GREAT job of setting up everything and having materials ready for us to use and customize the projects to our own tastes, decor in our homes, or as gifts for friends and relatives.


 The Letters Project was a perfect example of this - We all chose a letter to complete (or more) then looked through the patterned paper available, and covered the letters.  After that, you could stamp and add any embellishments to the letter you wished.

Here are some of the samples the ladies made.


This next project drew LOTS of OOOoohh's and AAAAahhhhs when we started getting this project finished.

We started with plain white canvas backing,  a page from a hymnal, and 2 plain wooden crosses.
 After tearing and tea staining the hymnal page, we painted the canvas background in one of 3 or 4 colors, and the edges of both crosses.


 As you can already see, this is where all similarities ended.  Each set of crosses looked completely different, but so amazing!

This black and white cross set got lots of rave reviews.  It's really stunning in person!

So, these were projects I took pictures of from some of the other members..... next post - the projects I made!

Modge Podge was definitely the word of the day for both of these projects!


Tuesday, October 8, 2013

Stamp Camp 2013 Part 1

What a weekend!

We had our annual Stamp Camp weekend this past weekend, and Kathy had some amazing projects for us to complete!  (Pictures and explanations coming...).

But first, even before we started our weekend, some of our camp members signed up for a 3D swap.  No cards was definitely the rule, so I had to do some thinking and researching - and after looking around online, I found this little cute project!

 The base is the Mini Milk Carton die, with lots of details and embellishments.  We made 10 of each piece, and I came away with some really CUTE swap items!
Here's the back view of my mini bird houses.  It includes a tea light which glows through the vellum pieces in each of the 'walls'.


Here are a few of the swap pieces I received in trade:


Monday, October 7, 2013

Gifts for our Chinese Visitors

Each year at the beginning of October, the school I work at hosts a group of 15 - 20 Chinese school children and their teachers.  We do so many activities with them as a school...  cookouts, lake trips, a trip to the fair, classroom tours... etc.  

Last year I made a booklet for each of the students and teachers - this year the idea was bookmarks.

 Our school mascot is the Husky - Hoover Huskies, and the Team Spirit cartridge has such an awesome image... I made one for each of the tour group.
 This is a close-up of the 2 3/4 inch cut and all its layers - black, 3 shades of gray, and white.  It's approximately 15 pieces for each Husky cut.

This piece I cut larger - for me.... It's a 3 1/2 inch cut (It actually didn't fit on the bookmarks.) and turned out quite large!  I took a little extra time to ink the edges, added silver stickles, and a black glaze pen added dimension and shine to the eyes, nose, and some other areas.

We had them laminated, and I was told our visitors LOVED them!  :)


Saturday, October 5, 2013

September 2013 Stamp Club Cards

Our word of the day this stamp club for September was.... Chevron!

Chevron in many different forms... chevron in different applications....  chevron, chevron, chevron!

 Our first card was just a fun, quick card - and my first opportunity to use the Core 'dinations cardstock!  Love how you only need to lightly sand it for an awesome visual effect!


 For the bow card, we used the large background chevron stamp to make the backing piece, and spent some time playing with the bow dies as well.


Can you say - Gift Card Holder!!!     Kathy always comes up with WONDERFUL ideas for gift card holders!  We have so many different types she's shown us, we could make these for the family for Christmas, and not duplicate for anyone! 
 This gift card holder is a matchbox fold, and uses the 'new' Envelope Punch to make the tabs to keep the top closed!  BRILLIANT idea for multitasking a seemingly one use item!


Here's the inside view of the card again using the pennant stamp set to make a party hat!  You can just see the flap in which to slide the gift card.

Fantastic idea!!!

Please enjoy!

Wednesday, October 2, 2013

I Did It! Such Wonderful News!

The last few years I've competed at our area State Fair.  It's such a strange name, called the Tulsa State Fair -  I've said it, and I've heard it many times....  "Since when is Tulsa a state?"  Silly, yes.  But it's HUGE!

This year I entered 3 items - 2 craft pieces, and a cake.  This afternoon my husband and I had a chance to go to the fair to check out how I did on my entries, and take a walk around the fair.  Like I said, it's HUGE!  We walked the midway and had a great time looking at all the rides, and through the buildings of competitive exhibits, the 4H exhibits - livestock etc.

I'm so thrilled to say that my yearly project - the calendars took a first, AND the division sweepstakes!  I'm so excited!!!!!!!!  :)

This is a project Mom and I spend about 2 weeks together working on when they (Mom and Dad) come to visit.  I usually spend about a month preparing the pieces for assembly as well.

 In the labels section here on the blog, if you click on CD case calendars, you can see close-ups of each page.

This was my second craft entry - it's a gift set of cards - all with that flower, but in a large array of different colors, and with matching stamped envelopes.  This was also a big project I did, and gave them as Christmas gifts.

Click HERE to see the entire set of cards in this gift set.

My chocolate cake... that everyone loves so much... that I make SO often I don't need the recipe now.....  Zilch.  :(  Oh well.  It is a great cake.

I'm just thrilled my calendars and card set did so well.

Thank you!