Sunday, July 6, 2014

Christmas in July - July 6, 2014


Today's card features a technique I used last summer - Star burst!  I used it for a class I presented, and added a few touches to this to make it special for a Christmas card.
Cut paper strips 4 1/2 inches long, and 1 1/4 inches wide.  Cut diagonally on the corners, and line them up in a star burst pattern.  The points don't need to match exactly!  You'll cover that with a medallion or sentiment piece as I did above.

I added some stamping on the background piece, and a bow with a rhinestone above the sentiment for some sparkle.


 photo enjoybermudabay.jpg

Christmas in July - July 5, 2014


OK, so I cheated a little bit on this one.  It's a very similar design as a card from last year's Christmas in July cards.  I just love it so much, I'm repeating the design - with just a few changes.

I used a different piece of DSP for the bow, and the star jewel is different from last year's brad.

Truth?  I'll probably make more of these during the year.

HERE is a video tutorial on how to make these punch bows.  You can see I made a few changes, but with practice, they're very easy! 


 photo enjoybermudabay.jpg

Christmas in July - July 4, 2014


We had a wonderful view of our local fireworks last night!  We don't go to the big city fireworks.  There are suburbs here that allow fireworks with a permit, so if you drive around and know where to look, you can see a really amazing fireworks show!

On to the Christmas Card for the 4th of July.  I've used this technique before.  My up-line Kathy Douglas used this at club, and I've used it many times since.  I LOVE it, and since it's a quilted design, I'm sure my Mom does too!  

This is one of the glue dot bows with a brass brad at the center. 
HERE is a YouTube tutorial from another SU demo on how to make these bows!


 photo enjoybermudabay.jpg

Saturday, July 5, 2014

Christmas in July - July 3, 2014 (Late)


 So I'm not usually big on excuses for things - but I do have a legitimate one, and things will be back on track, and on time with dates Sunday morning! :)

We went on vacation for almost 2 weeks, and returned on the 2nd... I was too exhausted to get the cards done on time for the 3rd and 4th, and our computer was acting up.  SO, now that I've got all that straightened out... here goes!

I saw these trees on a Pinterest post, or a crafter's website - I don't remember.  I'm posting two links below on how to make these trees... you can choose your favorite method.

I'm still using my favorite DSP Be of Good Cheer (and will for a few more days) - It's my favorite.

The trees are topped with glitter paper star, punched and added with dimensionals.

I had some of these trees made before we left on vacation, so it was a few minutes of remembering how to make them, and the card came together quite quickly!

HERE is the first link to make these trees, and THIS is the second link.  I used the first link.  It worked best for me.

I hope you try these!  They are pretty cute!


 photo enjoybermudabay.jpg

2014 Christmas Cards - July


Because I'm currently working on my Christmas in July cards, I made only four of these for this month's Christmas Cards throughout the year.
I really love this wreath.  It's 3 different sized stamps, all turned and placed together to make the concentric circles.
Real Red, Garden Green are the colors, with an old stamp set's sentiment Noel, and a Real Red taffeta bow.

It's not my usual busy, complicated card... it's very simple and straightforward.  I'm working on it!


 photo enjoybermudabay.jpg

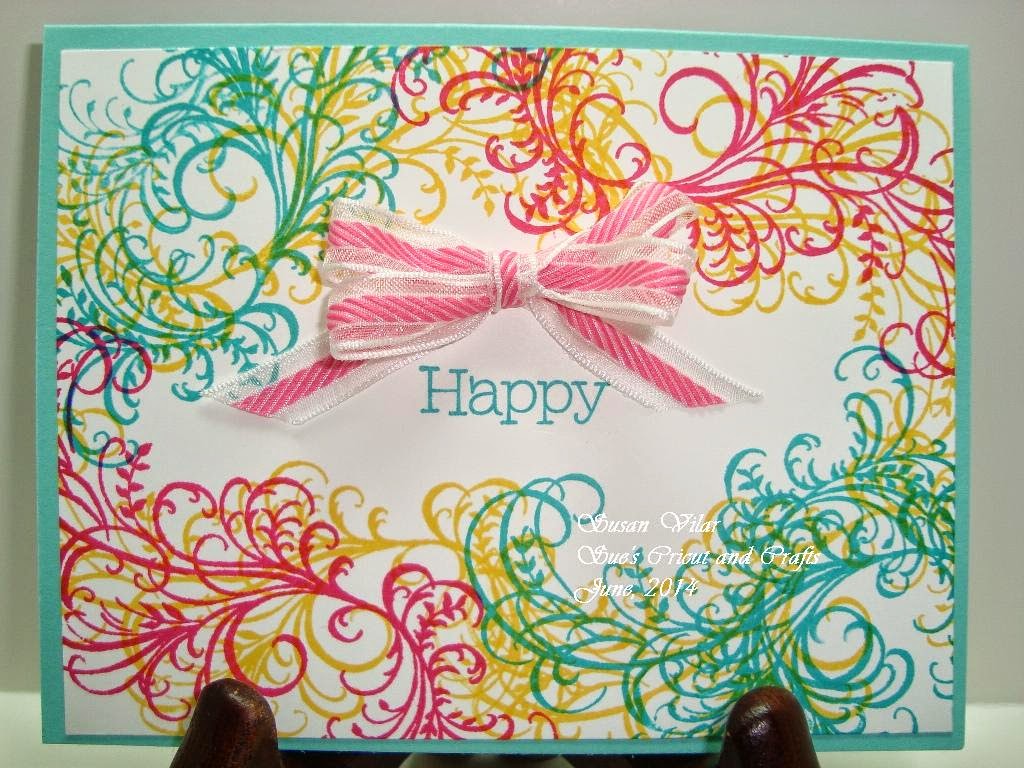
Happy Blogoversary to Me!

I LOVE these colors!  Have you noticed?
It seems 85% of the cards I've created lately feature these colors.... Bermuda Bay, Melon Mambo, and Daffodil Delight.

The other day I was reading a magazine (yes, I read a few) and there was a monogrammed card set using those exact colors.  I don't by any means follow fashion, but I was right-on with this color combination!

SO, it's my Blogoversary....  what does that mean?  On July 5th, 2008 I started this blog.  I don't post consistently by any means, and would like to receive more comments - but that's not why I blog. :)  Six years - that's such a long time!  Sometimes I look at some of the things I've created over the years, and remember how I made them, but it takes me a moment to realize, "Hey, I made that!" 

So.... this was one of the quickest and easiest cards I've made in quite awhile.  I'm using a scrolly stamp from Heartfelt Creations in the colors listed above.... found a Happy Holidays stamp and just inked the Happy part of it for the center... and had a ribbon with some Melon Mambo.

It probably took less than 5 minutes to make.
Hope you like it!


 photo enjoybermudabay.jpg

Wednesday, July 2, 2014

Christmas in July - July 2

July 2nd, 2014.  This post comes with a How-To link... How to make Paper Bows with Oval Punches.

Again, I'm using some of my very favorite Stampin' Up Christmas DSP... (same as yesterday) but with some of the other papers. 


I actually used lots of scraps to create this card!  The only pieces I cut (fresh) were the card base, and the red frame that holds the paper panels.
Cut the red (Cherry Cobbler) as a regular card frame or base at 4 x 5 1/4.  Each panel was cut at 3 3/4 inches, and 1 1/8 inch wide, though I feel 1 1/4 would work just as well, and give less red framing around each piece, and more DSP patterned paper.

I had a scrap of scallop trim, and vanilla for the sentiment that worked perfectly!  I added a bit of ribon, and used more scraps from yesterday's Dahlia card to make the paper bow.

HERE is the tutorial link on how to make the paper bows.  You'll see them a lot this month! 

Happy Christmas in July!


 photo enjoybermudabay.jpg

Tuesday, July 1, 2014

Christmas in July - July 1, 2014

Christmas in July is here again!
I'm going to try again this year to do it again - one card for each day of the month of July.

Here's my card for the first day of July.
It's a Dahlia fold card.  I'm going to make more of these, but I'll start with a smaller circle.  2 1/2 inch circles are too large for a regular A2 card base.  Oops!  Knowing that now, they'd be great on a scrapbook page at this size!

Once I started, I kept going because I'm using some of my very favorite DSP, and didn't want to scrap the project in mid-stream.
I could have used only half and adhered it to the edge, and had enough flower for 2 cards.... that would be a solution in hind-sight!  :)  Isn't hindsight wonderful....  it's always 20/20.

You can find a tutorial for these Dahlia folds on Splitcoast Stampers.  Just don't use a 2 1/2 inch circle on an A2 card base!


 photo enjoybermudabay.jpg

Tuesday, June 24, 2014

New Thank You, and a Tutorial

It's been a very long time since I posted a tutorial... and I have "trick" I've been using to make my Stampin' life SO much easier!!

First, the Thank You card.
I'm still on my rainbow colors kick - So bright and cheery!
I used the Work of Art, Papillion Potpourri, and Watercolor Thank You stamp sets...
Real Red, Tangerine Tango, Daffodil Delight, Wild Wasabi, Pacific Point, and Lovely Lilac (ret.) as my colors, with Smoky Slate for the Thank you.


Now for the tutorial section of this post!

Do you LOVE your clear stamps, but have a hard time keeping them stuck to the blocks?  It didn't really bother me too much, but it really was horribly annoying when we would do events, and the stamps just wouldn't stay on the acrylic blocks!

I love clear stamps because:  1. they take up much less space  2.  I seem to stamp straighter with them 3.  They take up MUCH less space  4.  Have I mentioned they take up much less space!  I can store them so easily.

This is the solution to this very frustrating problem.  It works GREAT, and takes only a few seconds to do.
 Anytime I get a new stamp set, I place the stickers of the images on the stamp, and then take my Zig pen (pictured below) {the small one} and run some of the adhesive over the top of the stamp.  You can see the lines in the picture above.
Zig pens are wonderful things!!!  They say 2 way glue, and they really do work!  The larger one I use to restick my Cricut mats (see the 'Articles for Everything Cricut'  section) and the smaller ones for gluing small pieces, and paper piecing when I'm working with my Cricut.

Run some of the glue over your stamps (the part with the picture that sticks to the block).  You don't need that much!  Just apply a thin film, and set it aside.  I usually let them sit a few hours or overnight to dry.  Now you have a stamp that won't fall off the block when you're using it, and will peel off when you're finished cleaning it!

I'd love to know how this works for you!


 photo enjoybermudabay.jpg

Sunday, June 22, 2014

Anniversary Card

Our 12th Anniversary was just a few days ago.

I used a card front I'd created a few months ago... and added the Apothecary Art piece after coloring it with watercolor pens and ink in the same colors of the base card; Bermuda Bay, Daffodil Delight, and Melon Mambo.


After coloring it, I die cut the piece and inked the edges so they'd stand out against the white background.  The right panel was just enough for some statistics.... years, days, vacations, etc.


 photo enjoybermudabay.jpg

Friday, June 20, 2014

Happy Anniversary!

Wishing my oldest nephew a very Happy Anniversary!

I saw a version of this card, and did some changing up...
The glittered base is a light blue, and everything else is a baby blue color.
Lots of punches, die cuts, and embossing as well as some ribbon.

Adhesive didn't want to stick on the glitter paper very well, so I went back and used dimensionals to keep the inchies where they belong.


 photo enjoybermudabay.jpg

Saturday, June 14, 2014

Crayon Wreath

I ALWAYS wanted one of these!!!  So, I made a Special Order for Me!


Actually, making it was much easier than I expected.  I used a little less than 88 crayons (a 64 box, and most of a 24 box...  some lettering I found online, and the chalkboard (with Cricut-cut lettering) and ribbon.

You need:
12 inch embroidery hoop
8 inch embroidery hoop
64 and 24 box of crayons
decorations (anything school related!)

You can find the letters HERE.  I copied to a word document, resized, and colored them with markers, and added black Glaze pen accents.


 photo enjoybermudabay.jpg

Thursday, June 12, 2014

Niece's Birthday!

My nephew's wife is having her Birthday today!

Happy Birthday, Alex!

For her card, I used all of our new In-Colors.  I CASE'D this card from one I saw - and made just a few changes.  I didn't notice it at first, but the flower stamps - Petite Petals have one that looks like it could be leaves!  I stamped that first on the background and adhered the flowers on top.

Colors?  With Gorgeous Grunge stamps, Mossy Meadow, Lost Lagoon, and Hello Honey.
The flowers are stamped in Blackberry Bliss, and Hello Honey.
Note:  The Blackberry is so dark I stamped off for the Happy Birthday, and used a water pen to color in the petals on the flowers and butterfly.
The other flowers are Tangelo Twist, and Hello Honey.
Rhinestones all around, of course!


 photo enjoybermudabay.jpg

Tuesday, June 10, 2014

Wedding Card

I'm recycling this wedding card *again*.. just because I love it so much!  It has lots of details, and makes such a pretty card!

My very dear friend from high school was married at the end of May, so I sent this out to her.  She's in the middle of her honeymoon, so I do hope she received it before they left!

 The Groom heart is a 3 piece process - just like the suit!  Cut the black heart down just past center, and fold the edges out.  Glue them down with a little Zig pen adhesive.  Use a black glaze pen to color the lapels, and a small bow tie cut from a scrap of black.  Allow these to dry.

Adhere the black groom piece on a second white heart, add the bow tie, and then add 3 buttons with your black glaze pen.

Emboss the white heart with a frilly design, and add Diamond Stickles.  When that dries, add pearl accents along the top.

The outside and inside white panels are stamped with a heart from the I{Heart}Hearts stamp set (ret.) in Platinum Brilliance Ink.
Add a frilly Congratulations stamp, some photo corners to each white corner as frame pieces, and your card is finished!

I really love this as a wedding card.


 photo enjoybermudabay.jpg

Saturday, June 7, 2014

Brother-In-Law's Birthday

After sending a text to my sister (3 states away) to find out what were Jack's favorite colors - she sent me a picture of him in his camo just after a hunt.  SO, camouflage it is!  Actually, more of a faux camo. :)

I don't think I've made a camouflage card before, but then I do forget things I've made... :)  As much as I've used Gorgeous Grunge lately, it really seemed to lend itself to a camo card!


I used the new In-Color, Mossy Meadow along with Crumb Cake, Chocolate Chip, and Soft Suede.  I also used a label layering technique I've been playing with, and will use more often in the future.  I really like the effect.

Happy Birthday, Jack!!


 photo enjoybermudabay.jpg