Showing posts with label SU Stamps-Well Scripted. Show all posts

Friday, June 19, 2015

Painted Blooms with a Mother's Day slant!

After showing the original 6 cards I made at my club, then everyone got together to make them!
My little class of 5 or 6 people (which I was VERY happy with) turned into 19 for our club groups!

WOW!

I was asked to make some cards with a Mother's Day bent since it was close to that time.  I have such a narrow view of Mother's Day...but some of the ladies at the class said they give 4 or 5 Mother's Day gifts each year!  Very extended families, I guess!

 Here are some of the samples I brought along for the group to use as inspiration.


 photo enjoybermudabay.jpg

Tuesday, June 10, 2014

Wedding Card

I'm recycling this wedding card *again*.. just because I love it so much!  It has lots of details, and makes such a pretty card!

My very dear friend from high school was married at the end of May, so I sent this out to her.  She's in the middle of her honeymoon, so I do hope she received it before they left!

 The Groom heart is a 3 piece process - just like the suit!  Cut the black heart down just past center, and fold the edges out.  Glue them down with a little Zig pen adhesive.  Use a black glaze pen to color the lapels, and a small bow tie cut from a scrap of black.  Allow these to dry.

Adhere the black groom piece on a second white heart, add the bow tie, and then add 3 buttons with your black glaze pen.

Emboss the white heart with a frilly design, and add Diamond Stickles.  When that dries, add pearl accents along the top.

The outside and inside white panels are stamped with a heart from the I{Heart}Hearts stamp set (ret.) in Platinum Brilliance Ink.
Add a frilly Congratulations stamp, some photo corners to each white corner as frame pieces, and your card is finished!

I really love this as a wedding card.


 photo enjoybermudabay.jpg

Sunday, June 9, 2013

Graduation Card

My youngest nephew is graduating from high school this weekend.  Among other things from us, he will receive this card.

Our high school colors are purple and white...  I've always loved those colors together!  I had good fun with all the gradients in this card.

 I used the stamp set "Blue Ribbon"... and lots of layers!  Concord Crush is the dark purple, and Wisteria Wonder is the lighter tone.  I also used a stamp-off to stamp the Congrats Grad all over the front, and Wisteria Wonder for the inside of the card.  Little stamp crazy??  Yes! :)  I still think it looks pretty good.


LOVE LOVE LOVE that Congratulations stamp.  It's got to be one of my most used stamps.

I also made a gift card holder - will post a picture of it later - so awesome in purples and whites!  It was one of our June 1st projects from my stamp club.


So many projects.... so little time!  :)


Wednesday, June 27, 2012

Baby Card - New Baby SU Stamp Set!

 My husband needed a baby card for one of his colleagues, so this is what I came up with.

It uses an "old" technique I've used often with the baby quilt in pink for a girl, but I'm using the new baby themed stamp set I thought was TOO cute in the new catalog!  It's called "Baby Boutique" #126350w/#126352c  It really caught my attention - and with the amount of baby cards I make over the year, I thought it was worth it.  I actually waited to make this card until my order arrived! :) 

I'm also using the new stamp pads - LOVE THEM SO MUCH!!!  What amazing coverage and great inking on large stamps!

This card uses some of the new Stampin' Up products, as well as some retired products.  For the background, I used the Stampin' Up Wheel Bella Boutique.  


Inside view of the card, additional cardstock popped off the base, and ticket punched on the corners. 


Your comments are always appreciated!
~*~ ~*~ ~*~ *~ ~*~ ~*~ ~*~ ~*~ ~*~ ~*~ ~*~ ~*~ ~*~ ~*~ ~*~

 A Proud member of The Lime Light. Click on over to see what we are doing.

Thursday, May 10, 2012

Thank You Cards, Congratulations, Happy Birthday, and a CUTE Project!

This post has lots of different cards.... I've been so busy with different projects, I thought I'd just put them all together, and explain each with a caption. Please enjoy!!


My youngest nephew just celebrated his 17th birthday, and in addition to being a very cool, awesome kid, he's got planes on the brain. I used the Need For Speed Stampin' Up stamp for this, and a new Ranger Ink I bought.... Black Enamel. YES! It's just like stickles, but solid black, and dries very shiny! I know my sister will love this!


We just have a new entry into the job market in the family, landing a GREAT job - so this was the card I sent, with a message on how thrilled I was regarding this great job... and how all the hard work has really paid off.


This is the Thank You card I sent along with the prizes for the April Christmas Card Challenge... Bashful Blue on vellum, with Dazzling Diamonds embossing powder.


Aren't these ADORABLE?? I bought them in February from OT... and have been using them as Mother's Day gifts with my kids. They turned out cuter than I imagined. I just had to share. :)
They are recipe holders! There's a clothespin on the back to hold it above the flower.


Your comments are always appreciated!

~*~ ~*~ ~*~ *~ ~*~ ~*~ ~*~ ~*~ ~*~ ~*~ ~*~ ~*~ ~*~ ~*~ ~*~
A Proud member of The Lime Light. Click on over to see what we are doing.

Saturday, April 7, 2012

Happy Easter


I bought this stamp on our most recent trip to Tennessee ~ Yay for Spring Break trips!

I never seem to get tired of looking at the mountains, mountain streams, and waterfalls.....

There's also an awesome scrapbook shop where we stay, and two on the trip over. I put this together, and sent it to Mom and Dad for Easter!

Happy Spring!

Your comments are always appreciated!~*~ ~*~ ~*~ *~ ~*~ ~*~ ~*~ ~*~ ~*~ ~*~ ~*~ ~*~ ~*~ ~*~ ~*~A Proud member of The Lime Light. Click on over to see what we are doing.

Monday, May 30, 2011

Set of Commissioned Cards... Graduation, Thank You's

So what do you do when your nephew is graduating, your husband requests a graduation card, and the school colors are brown and white?? BROWN AND WHITE!!! Who has such colors as school colors!!!!
After some serious thought, this is what I came up with... simple, because it's for our nephew... and in brown and white.
It's a pretty straightforward card, except I used a bookmark tassel I'd purchased for making bookmarks, cut it down, and popped two circles to hold the tassel. I also added two rhinestones to the front for some interest.


here's the inside view of the card.


This is another requested card from our librarian at school. She needed one for someone who was quite artistic. I loved this layered look so much! I used Pacific Point, Black and Vanilla carstock for this card... Pacific Point ink, and the Elements of Style stamp set.


I saw this card on Jeannie Phillips website a LONG time ago... and always loved it!! I needed a card for a horticulturalist, and thought this would be perfect. I used the first cut from the Walk in My Garden Cricut Cart to cut the daisies - making many, many layers. The one daisy in the inside is a little darker yellow cardstock. All pieces are matted and inked with Early Espresso and Black. The leaves are inked in Wild Wasabi and Early Espresso.

I'm not so sure I want to give this one away... it's really something in person!!


Here's the interior view... you can see a little of the flower inside as well as the identical matting from the front. Gotta LOVE the ladybugs crawling on the leaves!


Your comments are always appreciated!

~*~ ~*~ ~*~ *~ ~*~ ~*~ ~*~ ~*~ ~*~ ~*~ ~*~ ~*~ ~*~ ~*~ ~*~
A Proud member of The Lime Light. Click on over to see what we are doing.

Thursday, April 21, 2011

2 Special Cards; Confirmation & Sympathy

I had these two cards pending in addition to some other projects I'm working on... and had to get them out in the mail!

My cousin's wife was just confirmed this past Sunday, and this is the card I sent.


here's the inside view. I embossed both crosses with black embossing powder. The cross on the front got some color added with my SU markers, and the cross on the inside was ornate enough to need no other embellishments.


My dear friend from High School's mother died recently, and I made this card for her. Lots of pastel marker work, some Stickles highlights, and some pretty purples finished out this card for her.


Your comments are always appreciated!
~*~ ~*~ ~*~ *~ ~*~ ~*~ ~*~ ~*~ ~*~ ~*~ ~*~ ~*~ ~*~ ~*~ ~*~
A Proud member of The Lime Light. Click on over to see what we are doing.

Thursday, October 21, 2010

Wedding Card for my Cousin!

I'm SO excited for my cousin Jon! He's getting married on Monday to a very sweet girl named Olga. My Mom and sister have told me much about her, and Bennie and I are excited to meet her soon!

I've made several versions of this wedding card since the summer, and like it SO much! It's definitely my favorite. They should have the card and gift we sent along by the weekend.

I'm so sorry we couldn't be there, but we definitely will be thinking of them both on their special day!


This is the inside view of the card.


I used a 5 x 7 card base, and 3 Stampin' Up sets, I {Heart} Hearts, Teeny Tiny Wishes, and Salutations along with my Silver Brilliance ink to stamp the silver hearts on the background.

Your comments are always appreciated!

~*~ ~*~ ~*~ *~ ~*~ ~*~ ~*~ ~*~ ~*~ ~*~ ~*~ ~*~ ~*~ ~*~ ~*~
A Proud member of The Lime Light. Click on over to see what we are doing.

Thursday, April 29, 2010

New Baby Card

One of my coworkers just had a baby girl yesterday! I speak to her quite often, and wanted to let her know I wish her the very best with the new baby.


This card measures 4 1/4 by 5 1/2 inches - The outfit is cut out of DCWV paper from the Sweet Stack at 3 3/4 inches. I used a solid dk. pink cardstock to cut the hanger and flower center.


The Love background stamp is a commissioned stamp I had made from Lisa Ehmke (see links to her shop on the right side of this page!) at StampOutOnline for another project. It is inked and stamped on the background with Versamark ink. I also used a Rollagraph heart stamp wheel (Candy Hearts) I bought online with lots of great hearts for 2 rows on the front of the card, and to cover the entire inside of the card. If you look closely, you can see those adorable hearts!


The Congratulations stamp comes from the new Stampin' Up catalog - and their new clear stamp line. It is stamped with Melon Mambo to match the dk. pink on the front shadow pieces.

I also used a white and sparkle pink Glaze pens to highlight the wording.

All the edges of the cardstock inside and out as well as the hanging baby dress is inked with the Brilliance Pearlescent Orchid ink. It gives everything a very pretty glow.


As always, I love to hear your thoughts. Please leave a comment!!


~*~ ~*~ ~*~ *~ ~*~ ~*~ ~*~ ~*~ ~*~ ~*~ ~*~ ~*~ ~*~ ~*~ ~*~
A Proud member of The Lime Light. Click on over to see what we are doing.

Sunday, February 28, 2010

Stationery Box Refills - OSW Sunflowers

Since I bought my Cricut in March of 2008, whenever my parents come to visit, Mom and I plan one project to work on together. Our most recent project before this one was the CD calendars. They are very popular, and I get lots of wonderful comments from online friends as well as the people that received them. (Thank you!!)

On their way to Arizona, Mom kept saying she needed replacement cards for her Stationery Box from this past birthday, SO since I'm so stuck on these One Sheet Wonder cards, I decided to turn the daisy stamp into a sunflower. Yes, I know it sounds strange, but it really worked!

My SU rep is so wonderful!! 
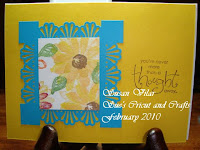
Kathy allowed me to borrow some ink pads I don't yet have to make up the colors for the sunflowers. I borrowed her More Mustard, So Saffron, and Apricot stamps, along with the Barely Banana and Yo Yo Yellow pads I have, we turned out AWESOME sunflowers!

We stamped the darkest color first, and then just layered all the yellows with the daisy stamp from the Watercolor Garden stamp set... and use Chocolate Chip and the Soft Suede stamped twice to get nice dark centers. They really do look like sunflowers!

Mom wanted some with reds, so we stamped a total of 6 sheets (Yes, I have lots of pieces left for more cards)... and had a ball!

THEN we got out all my punches from Stampin' Up, and Martha Stewart along with having to make a Hobby Lobby run to get some turquoise ribbon, and had fun matching colors and punches with the backgrounds. The Cuttlebug bit Mom pretty good, but she'll recover! Once she had that all worked out, she did all the embossing, and sentiment choosing.

It really was LOTS of fun!!

Please enjoy our One Sheet Wonder Sunflower cards!
As always, click on a picture for a screen sized view.


~*~ ~*~ ~*~ *~ ~*~ ~*~ ~*~ ~*~ ~*~ ~*~ ~*~ ~*~ ~*~ ~*~ ~*~
A Proud member of The Lime Light. Click on over to see what we are doing.