Showing posts with label Cuttlebug. Show all posts

Saturday, March 11, 2017

A Valentine Project with our 4th Graders

I've had a puzzle die for a VERY LONG time!

This year I thought of it in enough time to get the cardstock cut, and took my Cuttlebug to school.
 I used this sample to show the kids how it would look when they were finished, and what their task was to make this puzzle message as a gift.
I stamped the Happy Valentine's Day message in the center, and left the rest blank for the kids...  They wrote and colored the rest of the piece.  I cut each one and placed it in an envelope so they could present it to Mom, or Dad, or Grandparents, or Aunts/Uncles, etc.


Friday, July 3, 2015

Christmas in July - July 3, 2015


I'm calling this card "A Forest of Trees".  I actually received this stamp set as a gift, Thanks so much, Kathy!
I stamped the tree on Garden Green cs, and then used my aqua painter to add color.  They looked great wet, but when they dried, the color was much more muted.  I'm going to work with this technique again.


Each tree got an application of Stickles for ornaments, and fussy cut the trees.  These were originally going to be placed one to a card as a monthly set, but they seemed too small.  This grouping seemed to work the best.


 photo enjoybermudabay.jpg

Thursday, March 5, 2015

Lots of Baby Items!

It seems like I've been Missing In Action for awhile, but I've really been crafting!

It's just that Counted Cross Stitch takes so much longer than card making.... and I believe the piece becomes a keepsake, so the time invested is always worth it.  I never do anything half way, so it turned out to be quite a big piece!

I made something like this at Stamp Camp last October - memory trays all of a sudden are very popular, and I thought this would be a nice way for my cousin to show some pictures of his son.

I also made one for my principal with a few modifications.  :)

Here's the Cross Stitch.  I took it for professional framing and tried not to let the glass glare too much in the photo.

Here's the picture closer.  I used to hate doing the backstitching, but now it seemed to go so quickly - and it MUST be done for definition!  


 photo enjoybermudabay.jpg

Monday, November 17, 2014

Christmas Trees!

When I saw this stamp set, I HAD to have it!!!
I am crazy for Christmas trees.....  we have a 9 footer for the living room, I have a ceramic tree from my grandmother that my mother made on our sideboard (which stays out all year), and I have a collection of them that either stay out year-round, or come out after Thanksgiving until near Valentine's Day.

This stamp set is called Festival of Trees - it's also a clear stamp set, and so easy to use and line up the images!!!  This also comes as a bundle with the tree punch.  So easy to make beautiful cards quickly and easily!
After stamping the trees in Garden Green, I used the dots accent in Daffodil Delight, Pumpkin Pie, Real Red, and Pacific Point for the lights on the trees.

The snow is a Cuttlebug folder, inked with Soft Sky and the entire card is sprayed with Tattered Angels glitter mist. 


 photo enjoybermudabay.jpg

Tuesday, November 11, 2014

New Baby!

So I've decided that working full time teaching severely cuts into my crafting time, and I don't like it one bit!
That said,  I was asked to make 70 invitations to a baby shower for my cousin.

I was so thrilled to hear that they are expecting!  The new baby will be a wonderful addition to the family. :)

My cousin and his wife wanted green and yellow as the main colors, with a brown accent.  After some thought on this,  I went back to a design I've used before for 1 page shower invitations.
I cut the background invitation piece on my Cricut from the New Arrival cartridge, and inked it in a light brown ink to give it some definition.  The top piece is vellum, embossed with the Cuttlebug "baby" folder.
I ran out of time, so just a few of the vellum overlays had some inking to bring up the details on the embossing.

I used the retired Stampin' Up slot punch on the edges to thread the ribbon.  A little adhesive under the ribbon to keep everything together, and a trick I learned;  tie bows upside down.
I turned the cards away from me so I was looking at them upside down, and the bows all turned out right-side up!  Go figure. 

After assembling them, it took me just a few days to write out all the information needed for the shower.


 photo enjoybermudabay.jpg

Friday, June 20, 2014

Happy Anniversary!

Wishing my oldest nephew a very Happy Anniversary!

I saw a version of this card, and did some changing up...
The glittered base is a light blue, and everything else is a baby blue color.
Lots of punches, die cuts, and embossing as well as some ribbon.

Adhesive didn't want to stick on the glitter paper very well, so I went back and used dimensionals to keep the inchies where they belong.


 photo enjoybermudabay.jpg

Tuesday, December 31, 2013

2014 Calendar - February

February, 2014

After switching out last year's heart cut, I decided that from now on, I'm just going to stay with my favorite - the vertical hearts.  We used Shimmering Angels spray and if you look closely, the spots on the hearts shimmer in the light.  If you look closely, the base cut under the hearts is embossed with little hearts as well.

Anyone else watch the Winter Olympics every 4 years?  I can't wait!  February 6th is opening ceremonies!  I've already been watching some of the time trials to get to know the USA's athletes.   If you leave a comment, I'll tell you how I made the Olympic Rings!


 photo enjoybermudabay.jpg

Thursday, September 5, 2013

September's Christmas Cards!


On September's Christmas cards, I'm using almost all new product from the Holiday catalog, except one.

I recently rediscovered how much I really love the Stampin' Up Silver Embossing Powder!  It gives a beautifully smooth, shiny surface.  You don't have to fight it, you don't have to worry much about coverage, etc.  It just embosses beautifully.

SO, with one of the newest stamps that really caught my eye, I decided to make it really stand out and use very unusual colors.....

Before I go much further, let me tell you September's Challenge:   Sentiment!

Your 6 (or more cards) must have the sentiment as the focal point on the cards.


  I used the very last of my (small) stash of the new Smoky Slate cardstock, embossed it and inked the edges.  The black rectangle shows off the silver embossed piece spectacularly.  This is one of those cards that don't translate well on the computer, but are stunning in person!

I also love the new rhinestone embellishments.  The gray ribbon is a retired satin ribbon that just needed to be at the bottom. 
Here you can see the completed 6 cards.


Please enjoy!!!


Sunday, June 16, 2013

Father's Day Card


Who knew Father's Day cards would be such a dilemma!  Whew!  There are lots of great masculine cards out there, but I've already used lots of the ideas, and don't want to repeat any.  That's the problem!

I already used the old car in the weeds,  the grill, the shirt and tie....  now what!?
Plus, after retirement, my dad started making personalized cards on the computer with photos and things, so when I present him something he looks for the stamp I use on my creations... and then I get a grunt of approval.  Pressure!!??!!  :)

After spending quite a bit of time thinking, I remembered one of my Cricut carts has tools!  It just so happens that Dad is GREAT with tools and builds all kinds of great stuff... so this is the card I came up with for him this year.


I used lots of dimensionals to raise everything off the page... and used white and silver pens for accents.  The background is a piece of Crumb Cake cardstock embossed with the steel plate folder.


I hope he likes it! :)


Wednesday, October 3, 2012

Our Chinese Visitors!

 This is a very exciting week at my Elementary School!  We are having our yearly visit with our sister school in China's visitors return!

Last year was my first experience with this AWESOME project our school takes part in.  One of our sponsoring teachers asked me to make something for the visitors to remember their visit to our school.  She's been so kind to order gifts and projects from me before, we went through our usual discussion and idea session, and came up with this.

I used green cardstock for Oklahoma, since we live in what they call "Green Country" though it's been pretty brown this year with the drought!

I lucked out that the Hello Kitty cart had a nice Friends cut, and the other letters were cut and adhered individually.  Oklahoma, the names, and the dragon all have gold Stickles accents.  Each person chose an English name to use.  With the exception of one teacher, and two girls that chose Angel; I added their given names to differentiate the booklets so they wouldn't get mixed up.

There will be 15 visitors in all for the week, 10 kids and 5 teachers.  The assembly on Friday will be GREAT!  We had lots of interesting things to see, a gift exchange between the schools, and I got to see a Native American dance in person.  What an experience that was!  In early May, we send students and teachers over to China for a week to 10 day trip.


 Here's one of the booklets close up.... and if I could figure out how to rotate the pictures with this new interface, it would be in portrait format! 

I am thrilled to know that some of my work will go to China....  so exciting!  I hope they like and appreciate their books.


Your comments are treasured!


Friday, July 27, 2012

Opening Day of the XXX Olympics in London!


 After seeing the rings on TV, I thought I'd give them a try from my crafting supplies.

I'm not usually the patriotic one in the family... that's Mom - she's the Red White and Blue Queen!!!  This top card with the rhinestone additions will go to her for sure!  I know she's going to love it - we always watched the Olympics - summer, winter - didn't matter!


 The hardest part of making these was actually gluing them together.  Making the rings was a cinch!  Use the 1" circle punch, cut out a circle leaving enough room to punch around it... you need just a little space.  Then use your 1 1/4" punch lining it up so there's an equal amount of cardstock border showing and punch! 

Cut through the yellow and green circles once, and link the rings... glue 'em up, and have fun!

I admired this font set from the CardMaker magazine, and since I'm no good at anything freehand, I traced them on Vellum, and colored the backs.  It's a stained glass technique, just used a little differently.

I hope everyone enjoys the Olympics as much as I do!  I'm especially looking forward to all the little interest pieces they'll do on the UK.  AND the opening ceremonies, of course!!

Your comments are always appreciated!

 ~*~ ~*~ ~*~ *~ ~*~ ~*~ ~*~ ~*~ ~*~ ~*~ ~*~ ~*~ ~*~ ~*~ ~*~
 A Proud member of The Lime Light. Click on over to see what we are doing.

Thursday, January 5, 2012

The 2012 Christmas Card Challenge! January


Here it is!!! The FIRST 2012 Christmas Card Challenge for January.

Please refer to this POST by clicking HERE for all the rules and regs for participating in this challenge. (They're easy!!)

Post the above logo on your blog, and link back to this post so when people click it, they can go right from your blog here, and so on and so forth.
OK.... so here it is!

January 2012's challenge is: Ornaments!
Make your 6 cards including ornaments, post it to your blog, and use the linky (at the end) in this post to link back here.

Remember you have until midnight on the 20th with voting starting on the 21st through the 24th! The winner will be announced on the 25th.


Here are my two pictures for this Challenge. I really LOVE these ornaments!
Christmas trees and the ornaments are some of my absolute favorite things at Christmas time, and here's a chance that on Jan. 5th your tree is still up and you're looking at some ornaments! Ours is! We're taking it down a little later this week. :)


I used the Cuttlebug to emboss the background red paper with Musical Flourish, and then Cherry Cobbler ink to highlight the embossing. White, red, and green rhinestones highlight spots on the ornaments. I used the Ultimate Crafter's Companion to tie the bows, and DCWV paper from the Merry Christmas stack at the bottom.
Did you stamp your envelopes? I did, but didn't take a picture. Next time!!


SO.... write up your card/inspiration etc. and include your post above in the linky!
GOOD LUCK!!


Your comments are always appreciated!

~*~ ~*~ ~*~ *~ ~*~ ~*~ ~*~ ~*~ ~*~ ~*~ ~*~ ~*~ ~*~ ~*~ ~*~
A Proud member of The Lime Light. Click on over to see what we are doing.

Thursday, October 27, 2011

Wedding Card Variation

One of my husband's coworkers got married a week ago, so we sent some gifts and I made this card. The silver background paper came from the wrapping paper I used from Bed Bath & Beyond. It's so pretty! I added the bride and groom hearts and a new stamp set from Stampin' Up (Petite Pairs). It worked so well as you can see - piece on the front with a matching sentiment for the inside. Love this new set!!!


I used the debossed side of a cuttlebug folder and a silver pen to highlight the scallops.


Your comments are always appreciated!

~*~ ~*~ ~*~ *~ ~*~ ~*~ ~*~ ~*~ ~*~ ~*~ ~*~ ~*~ ~*~ ~*~ ~*~
A Proud member of The Lime Light. Click on over to see what we are doing.

Monday, October 3, 2011

Study of an Iris - Layers and Layers!

I bought this stamp and Nestabilities die set at the CKC show in August and have been playing with it for awhile now. Some of the samples they had at the show were completely stunning!

Here's a completed Iris piece in yellows. I stamped 6 images and ended up using 5 of them for this piece. I used burnishing on the base to give it a blue background... the colored the irises and greenery with my Stampin' Up markers. Gotta LOVE those Stampin' Up Dimensionals! They really help keep the layers separate.

Here's another view of the same piece from the "bottom".


Here it is all finished - So Saffron paper as the background - another Heartfelt Creations Nestabilities die behind it in purples to compliment the yellow. The top piece is a Cuttlebug die and a Stampin' Up retired stamp for the sentiment. I really like purples and yellows together.
It's difficult to see, but I sprayed the iris piece with some yellow Glimmer Mist to help it glow. Unfortunately, you can only see this in person.


Here's the card again from the side. Now to figure out how to get all those layers in an envelope! :)

Your comments are always appreciated!

~*~ ~*~ ~*~ *~ ~*~ ~*~ ~*~ ~*~ ~*~ ~*~ ~*~ ~*~ ~*~ ~*~ ~*~
A Proud member of The Lime Light. Click on over to see what we are doing.

Tuesday, September 27, 2011

Two Cards - Thank You / Birthday

I had two cards to make recently. I got my first order on the Stampin' Up site! I was THRILLED!!!!! SO, I sent this card out to my customer. I hope she likes it!
This new embossing folder is called Tiffany. I know it's going to get lots of use! It's so pretty!


This card I made for someone who LOVES the water, and the color yellow. Lots of different techniques here: watercolors, markers, stamping, punches, layers, etc. Never thought I'd use this stamp as much as I actually do... so THERE! You never know, do you?


Your comments are always appreciated!

~*~ ~*~ ~*~ *~ ~*~ ~*~ ~*~ ~*~ ~*~ ~*~ ~*~ ~*~ ~*~ ~*~ ~*~
A Proud member of The Lime Light. Click on over to see what we are doing.

Wednesday, February 9, 2011

Two Requested Baby Cards

Hey there!! Here I am, still snowbound in Okielandia!! SO many days with schools closed, and I'm just happily playing around my craft room.

When Mom was here in December with our yearly calendar project, she had a chance to look through some of the cards we made during club this year, and LOVED the quilted card. Click HERE for the link to the original card. Not so strange that she'd love it since her thing is making actual quilts (and winning awards for them).

Since she had a shower to attend in April, she requested one card of each.. a girl and a boy card. With Sale-A-Bration going on, I was able to get the baby bear stamp set free, and found some very pretty pink shaded and blue shaded papers in the catalog. I also got the Welcome Baby tag as part of another Sale-A-Bration set!

I love it when a plan comes together!!! LOL

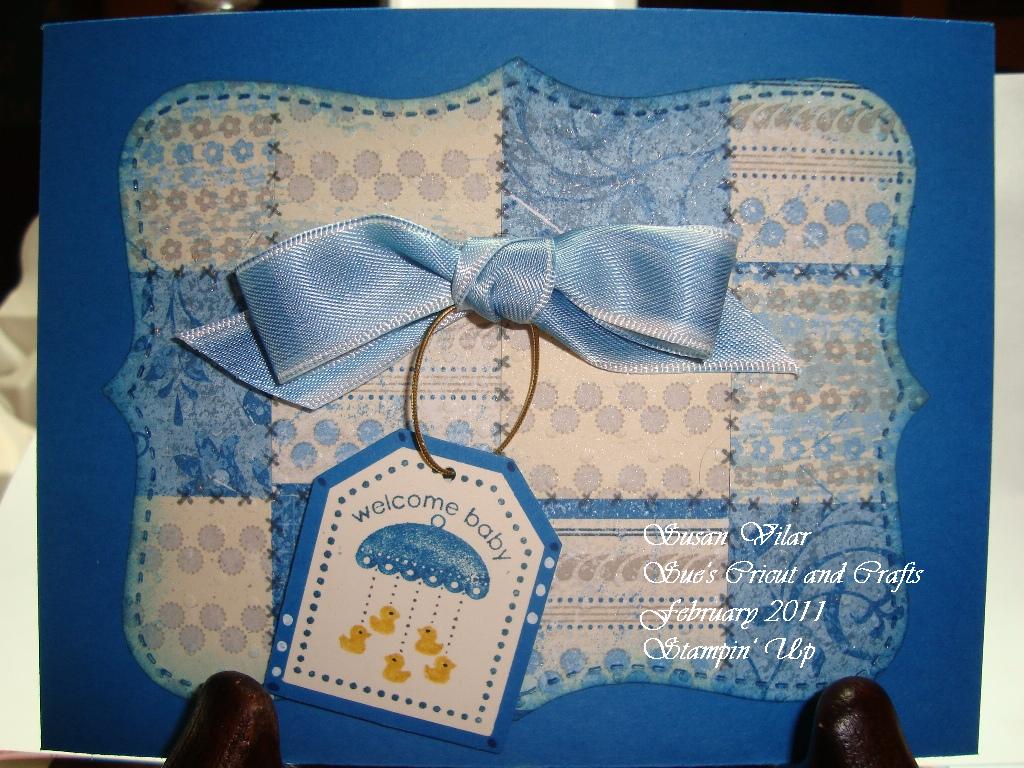
SO, here are my 2 cards, with views of the insides as well.

I used Pretty in Pink cardstock, Lap of Luxury DSP, White Organza ribbon for the bow, the Top Note Die, and the stamp from the Punch Bunch set in the Sale-A-Bration catalog. I also embossed the edges of the card with Framed Tulips. Both cards carry this detail; The Top Note quilt piece was embossed with the Swiss Dots folder, Going Grey marker to make stitches, and Champagne Mist to make the quilted piece sparkle.


The inside of the card is a piece of Very Vanilla cardstock clipped on the corners with the Scallop trip border and inked with Pretty in Pink. The bear is colored in pinks and burnished in Creamy Caramel(ret.) and Close to Cocoa(ret.).


Here's the boy card - very similar to the girl card, except with Pacific Point cardstock, Blueberry Crisp DSP, white satin ribbon colored with Pacific Point ink.


Since it was a card for a little boy, I made it a little less fussy - the bear is colored with shades of blues, and burnished with the same colors as above.

I'm not really into the Build-a-Bear anything... but I saw this stamp set, and knew with all the babies coming up, this would be just perfect in cards!!!

Your comments are always appreciated!

~*~ ~*~ ~*~ *~ ~*~ ~*~ ~*~ ~*~ ~*~ ~*~ ~*~ ~*~ ~*~ ~*~ ~*~
A Proud member of The Lime Light. Click on over to see what we are doing.

Monday, February 7, 2011

Sympathy Card

I found out this afternoon that a lady that did me a great favor many years ago passed this past Saturday.

I put this card together for her son and daughter-in-law. They were high school classmates I see infrequently, and I wanted them to know how much I appreciated her gift to me.


inside the folded over Top-Note die, I wrote a message for my classmates.


SO many details on this card! I used two Sympathy stamp sets from Stampin' Up, the Build-a-Blossom stamp set from SU, Diamond Stickles, a damask embossing folder (Sizzix), the Top Note die from SU, and an old corner punch I've had for quite a long time.

Ink colors used: Concord Crush, Regal Rose, Daffodil Delight, More Mustard, Tangerine Tango.
Markers: Barely Banana, Lovely Lilac, Almost Amethyst, Apricot Appeal.
Cardstock: Very Vanilla, Almost Amethyst, Concord Crush, and a SU envelope

Your comments are always appreciated!

~*~ ~*~ ~*~ *~ ~*~ ~*~ ~*~ ~*~ ~*~ ~*~ ~*~ ~*~ ~*~ ~*~ ~*~
A Proud member of The Lime Light. Click on over to see what we are doing.