Tuesday, July 29, 2014

Christmas in July - July 26, 2014


 Here again I'm using the Watercolor Winter stamp set.

The only thing I can think of saying about this card is that I'm going to add a layer of black between the stamped image, and the red/green striped DSP.  I looks great in person, but having that layer of black, even on a Christmas card helps the image show better.


 photo enjoybermudabay.jpg

Christmas in July - July 25, 2014


There's a stamp technique 'out there' called Triple-Time Stamping.  I put a tutorial here with measurements of the layers.  I'll give you the link a bit later in this post.
I call this Triple-Double stamping.  It's the Triple-Time Stamping technique along with 2 step stamping which is a two layered stamp to make a single image.

I used the Watercolor Winter stamp set, and the Merry Christmas from my very favorite Bells and Boughs set.

The Triple-Time stamping takes a little courage, as it doesn't look like much when you're in the middle of it, but it always comes together beautifully!  Remember, you're stamping on layers, so some of the areas will not stamp along the edges.... BUT that area is covered with the mats.  

Click HERE for the post including all the measurements and instructions you'll need to make these amazing cards.


 photo enjoybermudabay.jpg

Thursday, July 24, 2014

Christmas in July - July 24, 2014


Here's another more detailed card for today's Christmas in July celebration.
 I really like the Tri-shutter card design.  It's not all that complicated for a seasoned card-maker, though maybe a little challenging for someone just starting out.  I first made one of these a year or so into my card making only because that's when I discovered the tutorial. 
 For this card, I used a base of the Gumball Green,  the retired Be of Good Cheer DSP, and lots of other details.  The mitten punch, Scent-sational Seasons stamp (gingerbread man) and die set,  one of the SU ornaments, and one of my favorite stamp sets... Jolly Bingo Bits!

I've had lots of fun with my Stickles the last two days... lots of little touches here and there.  Red and Green buttons on the gingerbread men, holly berries on the wreath, yellow to accent the star.  I also added rhinestones on the ornament, and as holly berries.

One thing about these, every time I make one it never seems to come together well until the end.  I'm thrilled with how this one turned out!

Click HERE to find a tutorial on how to make the Tri-Shutter Card.  No, it's not difficult, it just takes some time and patience.


 photo enjoybermudabay.jpg

Christmas in July - July 23, 2014


 OOPS!  I meant to get this card up for yesterday, but I've been very busy getting ready for this coming school year - starting out with a full classroom and all after years working peripherally - it's been a hectic summer!  That's my excuse, and I'm sticking to it!!  :)

 Today's card is a tri-fold card.  Not difficult to make, just a little time consuming, but SO worth it!

This card does fit into a regular A2 envelope, even though it doesn't look like it will.
I punched and die cut a lot more gingerbread men than I needed for this card, so you're going to see them pop up in the next few days! :)

I used the Gumball Green Coordinations cardstock  as a base, and embossed the front and back panels and sanded them to take advantage of the effect of this paper.  I didn't emboss the center panel so I could use it for the greeting, and it would be hidden when the card was closed.

Click HERE for a tutorial on how to make the cuts for this very cute, relatively simple card.


 photo enjoybermudabay.jpg

Tuesday, July 22, 2014

Christmas in July - July 22, 2014


This card uses one of the new photo-polymer stamp sets from Stampin' Up called What's My Type.  It has so many possibilities! This stamp will get lots of use!  The catalog shows an entire alphabet stamped with the shapes.
Here, I used it as a type of awning (I hope that's the impression you get).
As I work with this set more often, I see endless possiblities - and have learned about getting the images lined up.  It takes only a little practice.  Once you get started, it's not as daunting as it seems.

The bottom piece of cardstock is the piece I tore from the card earlier this week - I couldn't just let it go to waste!
In the center snowflake are some more Christmas Red Stickles.


 photo enjoybermudabay.jpg

Monday, July 21, 2014

Christmas in July - July 21, 2014


LOVE this card!  It features a small piece of the Candlelight Christmas DSP, a double bow from the Cherry Cobbler seam binding, and NOEL!

This NOEL is so much more informal that the earlier card this month - but cute!  So why do I have a bow in the center of the middle image, you ask?  Because my original plan didn't quite work the way I wanted it to... but I didn't hate the image.  SO, I added some Christmas Red stickles to the package dots... and because the center NOEL was a little to crowded, the bow seemed to add some way to break up the "crowdiness"....  Yes, a new word! 


 photo enjoybermudabay.jpg

Sunday, July 20, 2014

Christmas in July - July 20, 2014


Today I'm featuring another of my Clearance Rack finds!  Coordinations cardstock.  I've looked at this cs for many years - it's been available a long time.  Since Gumball Green is a retired color, and supplies of this cardstock are either low or difficult to find, I took advantage of the sale.

This is just a first toying with the cardstock, I tore it to get the color difference and show the inner color, and got out a sanding block (also on the clearance rack) to distress the front.


The stamp set is from CTMH - and I added some Christmas Red stickles for a little sparkle.


 photo enjoybermudabay.jpg

Saturday, July 19, 2014

Christmas in July - July 19, 2014


As I'm going through this project, it seems to me that my cards are increasingly simple.  This is something quite out of the norm for me.... I usually make quite elaborate cards - lots of details, lots of techniques.

It's not that I've run out of ideas... I realize now I could do this for another month and not worry about duplicating a card... No, I'm NOT doing that.  :)
I also believe it's because we traveled quite a bit during June/July this year.  Quick and simple so I could meet my self-imposed deadlines, and still enjoy traveling with my husband.  Last summer at this time he was traveling for business, and I had lots of time to myself, hence more elaborate cards, I believe.
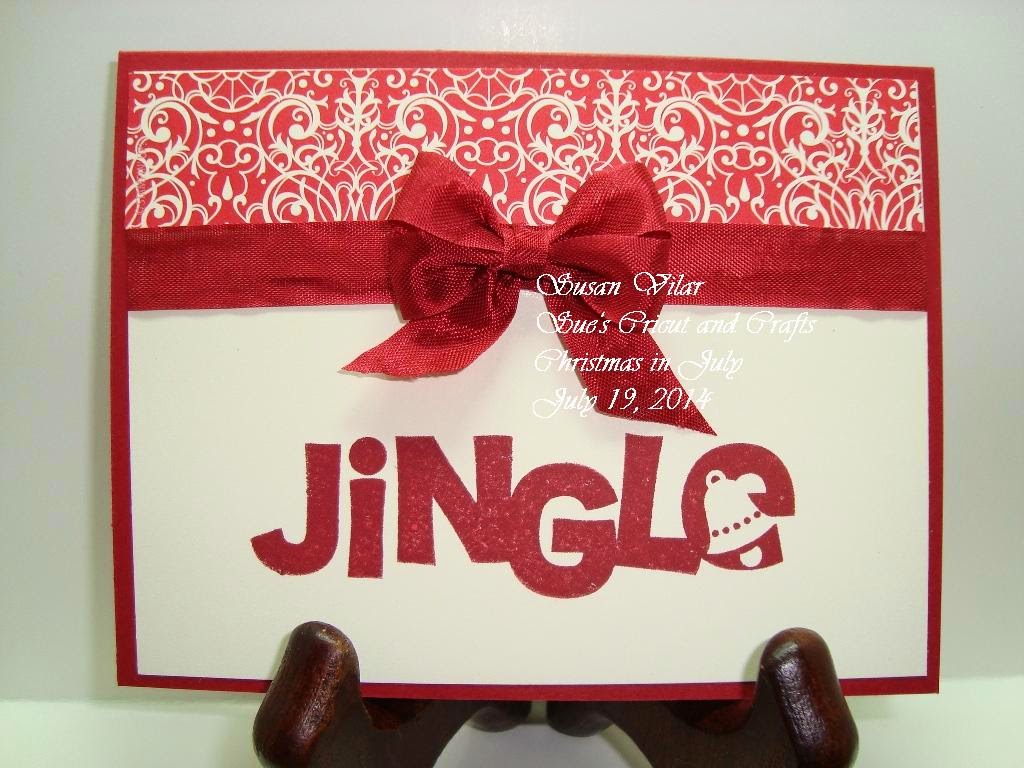
All that said,  I really enjoy this simple little card - I've used the Jingle before... Love it!  This time I used my little bow maker for the double bow out of the Cherry Cobbler seam binding, and a strip of the Candlelight Christmas DSP.

If you are an avid Stampin' Up stamper, you'll notice something about the pattern on this paper - it turns out to coordinate with one of the embossing folders!
NICE!


 photo enjoybermudabay.jpg

Friday, July 18, 2014

Christmas in July - July 18, 2014


The card for today features a die-cut Merry...  I received a Stampin' Up order of some bits and pieces of things I needed for projects, and I took advantage of lots of items on the Clearance Rack!  There is a set of 3 Thinlits dies;  Thankful, Merry, and Love.

One tip I'll pass along to you - make sure you use a small piece of waxed paper between your cardstock and the die.  It will make removing the cardstock MUCH easier!  :)  Yes, I did remember to do that when I cut "Merry".
I used a piece of DSP from the Candlelight Christmas stack, and used a hand-tied bow. 

I know I'll use this "Merry" quite often!  So pretty!


 photo enjoybermudabay.jpg

Thursday, July 17, 2014

Christmas in July - July 17, 2014


 I've been working hard on the Christmas cards for this challenge even though I haven't written that much about each card.  Some have been simple and straight forward, but not this one!

This really wasn't that difficult to make, it just uses a lot of different techniques and materials.


This is an Easel card, embossed with silver embossing powder over a Heartfelt Creations stamp I like to use... it's pretty and frilly.
I then die cut the center piece, and stamped and embossed a tree in green ink, and then the silver embossing powder on the top piece.
I used another die to cut the stopper piece from the bottom front edge to give it dimension as well.
I had a stamped Merry Christmas piece to place on the front, but placed it in the back instead.  I will add another embossed Merry Christmas stamp at the base in the front.

I have a battery powered candle behind the vellum.  This card will either be hand delivered, or sent in a box because of it.


 photo enjoybermudabay.jpg

Wednesday, July 16, 2014

Christmas in July - July 16, 2014


As I did yesterday, here is another piece from the Work of Art stamp set we received at the catalog reveal.  I stamped off each Cherry Cobbler and Garden Green except one - near the center of the card is fully inked.

This is one of my very favorite Merry Christmas stamps!  It's old, and long retired.  I removed it from the wood block and backed with the foam mount so I'm able to keep it with a set of other Christmas stamps.  So much easier to find that way!


 photo enjoybermudabay.jpg

Tuesday, July 15, 2014

Christmas in July - July 15, 2014


This card features a background I used in a card earlier in the spring, and during our new catalog event on June 14th.  Here I'm using Christmas colors - Cherry Cobbler, and Garden Green as the background.

I stamped the Jolly Bingo Bits pieces, punched them out with the 1 inch circle, then opposite colors of cardstock for the backing 1 1/4 inch scalloped circle mat.  I like to add Cranberry Stickles to the bingo pieces... and a rhinestone for the tree's star.


 photo enjoybermudabay.jpg