Sunday, May 24, 2009

Mockingbird on our Back Porch

This Mockingbird sang on our back porch for almost 5 minutes - quite loudly - until I realized he was so close. Luckily we were sitting in the living room, and I had the camera handy. I still can't believe how loud he was, and he sang for a long time! I'm just sorry I missed the entire song.

Please enjoy one of our Okie birds.

Flowerpot Swap finished!


This is one of a set of six Flowerpot cards I made for a swap on the Cricut Messageboard. We'd made one at my Stampin' Up Club in April, and all of a sudden, they were everywhere!


I used the following things from Stampin' Up: Lovely Lilac, Real Red, and Pink Passion Craft inks, Tangerine Tango classic ink, and Close to Cocoa classic ink; the Eastern Blooms stamp set large flower, the One of a Kind stamp set flowers and coordinating punch, the Curly Label punch with the Elegant Cheer stamp set.


I cut, then embossed the flowerpots with the Distressed Stripes Cuttlebug folder, and punched the edge with the MS arch border. From the Old World stack, I also arch-border punched some coordinating paper, and attached it under for a double border.

The card is held together with some sheer lilac ribbon, and the punch on the front with Just a Note from the Stampin' Up set.


I stamped and then heat embossed the flowers with Ranger embossing powder, made centers, and then attached the pieces with brads. The leaves are dark and light green cuts from the Accent Essentials Cricut cartridge.

~*~ ~*~ ~*~ *~ ~*~ ~*~ ~*~ ~*~ ~*~ ~*~ ~*~ ~*~ ~*~ ~*~ ~*~
A Proud member of The Lime Light. Click on over to see what we are doing.

Thank You card


I made this card sans-Cricut at the request of one of my co-workers. At the time, I didn't know it was a power-cord issue - so thank goodness I had some Stampin' Up sets to make a Thank You card.

I used the heat embossing technique on the inside from our Club meetings... and one of my newer sets to make the layers for the front of the card.

Good thing I cut a sheet of photo corners, so I have a baggie full, just the right size!!

Thanks for looking!

~*~ ~*~ ~*~ *~ ~*~ ~*~ ~*~ ~*~ ~*~ ~*~ ~*~ ~*~ ~*~ ~*~ ~*~
A Proud member of The Lime Light. Click on over to see what we are doing.

Birthday Flowers from my Uncle and Aunt!


Some pictures of the beautiful pink roses and other flowers I received from my Uncle Paul and Aunt Nancy for my birthday this past Wednesday!!!

They are so SO pretty...
Thank you!!
~*~ ~*~ ~*~ *~ ~*~ ~*~ ~*~ ~*~ ~*~ ~*~ ~*~ ~*~ ~*~ ~*~ ~*~
A Proud member of The Lime Light. Click on over to see what we are doing.

Cricut is DEAD! ****REVISED!

***** NO NO NO NO NO!
My Cricut E is NOT dead! For some reason, the power cord on it went out. Now, with a new power cord, my E is back and running!

NO FUNERAL at my house!! Oh JOY!

Funeral services for Sue's Cricut will be held on Thursday, May 21, 2009 with burial in the trash bin on Friday and interment at the dump.

The good news is that I will be buying a NEW Cricut Expression to replace the dead one on Friday as a birthday gift to myself!!

I had my E for 1 year, 2 months, and 6 days before it gave up the ghost... and it really did a lot for me. There was a point for about 6 months that I used it every day for quite a few hours. SO, it really did give its all.
~*~ ~*~ ~*~ *~ ~*~ ~*~ ~*~ ~*~ ~*~ ~*~ ~*~ ~*~ ~*~ ~*~ ~*~
A Proud member of The Lime Light. Click on over to see what we are doing.

Saturday, May 23, 2009

Post 9 of New "Old" Things - Get Well Card

October, 2008

One of my husband's colleagues fell at home, and hurt himself, so DH requested a get well card. This guy has quite a sense of humor, so I used the PDDU cart twice - once for the boy in pajamas, and then cut out the mummy. I trimmed off the leg, and used it as a cast!

I used my clear stamps to double-stamp and emboss the Get Well Soon image, and popped it with some 3m dots. I also used my Stampin'Up Baroque wheel and the Fiskars ribbon punch to thread the ribbon through.

The colors here on the computer don't look that great, but IRL, it worked GREAT.


~*~ ~*~ ~*~ *~ ~*~ ~*~ ~*~ ~*~ ~*~ ~*~ ~*~ ~*~ ~*~ ~*~ ~*~
A Proud member of The Lime Light. Click on over to see what we are doing.

Thursday, May 14, 2009

Mother's Day Cards for 2009

This is a series of 3 Mother's Day cards I made this year. My Mother-In-Law requested that I make a card for MY mom from her. Yes, a little unusual, but it makes her happy. This first card with the tulips is the one I made because it's different than the one we were sending to my MIL.

I have a previous post back to the Cricut Messageboard regarding this tulip card - it's not my original idea - scraplifted from another Cricuteer. I do love it though, even though it takes some time.

The ladybugs were cut at 1/2 inch and are the perfect size for these flowers! The butterflies are two Martha Stewart punches layered and trimmed to match.

This side view of the card shows the darker green shadow behind the lighter green leaves and stems.
The Happy Mother's Day is a cut from the Wild Card Cart! Gotta LOVE the photo corners - Okie turned me on to those - she does amazing things with them. They're from the Jasmine Cart.
I can't begin to tell you how much I LOVE these daffodils! This card I made twice - one for my Mom, and one for my MIL. Same butterfly punch from Martha Stewart, just in another color.
Another side-view showing the darker green shadow behind the flowers to add dimension.
I added some doodling after I took the picture to add just a little to it.

I hope you enjoy these. I LOVE them! Never thought I'd get as much use out of the Walk In My Garden cart as I do... I guess you just never know.
Happy Mother's Day!!


~*~ ~*~ ~*~ *~ ~*~ ~*~ ~*~ ~*~ ~*~ ~*~ ~*~ ~*~ ~*~ ~*~ ~*~
A Proud member of The Lime Light. Click on over to see what we are doing.

Wednesday, May 13, 2009

Post 8 of New "Old" Things - 4th of July 2008


These 4th of July cards were sent to my family.. These were my first foray into Studio G stamps - and I was hooked! They are the perfect small size, and do the job so well!
I cut the star from Plantin Schoolbook, and just layered the paper. I tried heat embossing on the circle, but I wasn't quite sure how to do that yet, so it didn't work as well. I've now got it all figured out, so this year's cards will be MUCH improved!
I still use my Cuttlebug so much! The Divine Swirls folder is one of my favorites.
~*~ ~*~ ~*~ *~ ~*~ ~*~ ~*~ ~*~ ~*~ ~*~ ~*~ ~*~ ~*~ ~*~ ~*~
A Proud member of The Lime Light. Click on over to see what we are doing.

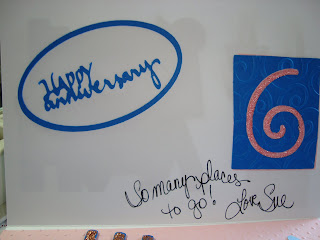
Post 7 of New "Old" Things - Anniversary Cards


We just travel SO much... lots of time to the same places, but still travel often, I wanted to make this card for our anniversary.


I highlighted the map with stickles to show all the places we've already traveled, and the entire map to show where we still need to go!
I made this card in June of 2008... I look at it now, and like most of it, but realize how much my skills have improved!

June 2008... I cut all these hearts from Plantin Schoolbook... and just had a good time collage-ing!


The designs on the hearts are made with a template - and glaze gel pens.


Happily Ever After was cut from a Disney cart, and the gem highlighted with diamond stickles.

I made these in June of 2008 to celebrate our 6th anniversary. We always give 2 cards...one cute/funny one, one a little more serious.

I'm very excited to say that this year, 2009 my cards will be of much better quality! Having the Cricut and visiting the messageboard for over a year has greatly improved my skills above this level.


~*~ ~*~ ~*~ *~ ~*~ ~*~ ~*~ ~*~ ~*~ ~*~ ~*~ ~*~ ~*~ ~*~ ~*~
A Proud member of The Lime Light. Click on over to see what we are doing.

Sunday, May 10, 2009

Cards for Soldiers "Red, White, and Blue" Challenge 5/1 - 5/22


As you can see from the side bar on my blog, I've been caught by the "Inchie Bug" lately. I signed up for the Red, White, and Blue Challenge this time for CFS... and just got my Series 30 stamps in the mail from Pez... They were PERFECT for this challenge! The timing just couldn't have been better.

I used Brilliant Blue and Real Red Stamin' Up ink for the images, Marvy Brush markers in red and blue for some extra color accents.

Each card has 2 Twinches, 3 Inchies, and one flag that measures 1" by 1.5". That one just didn't look right on a 2x2 piece.

Please enjoy!

~*~ ~*~ ~*~ *~ ~*~ ~*~ ~*~ ~*~ ~*~ ~*~ ~*~ ~*~ ~*~ ~*~ ~*~
A Proud member of The Lime Light. Click on over to see what we are doing.

Baby Shower Cards


This past Tuesday we had a dual baby shower after school for two of our teachers - these were the cards I made them. I did also decorate the inside of the cards as I have recently started to do, but didn't take any photos. (Next time!)
Please enjoy!

~*~ ~*~ ~*~ *~ ~*~ ~*~ ~*~ ~*~ ~*~ ~*~ ~*~ ~*~ ~*~ ~*~ ~*~
A Proud member of The Lime Light. Click on over to see what we are doing.

Birthday Card for Our Nephew


Our youngest nephew just turned 14 a little earlier this week, so I made this card for him. I wasn't able to cut his name with my Cricut, :( so that was hand-written, but I did have some tags from TBBM to 'hide' his gift card.
All stamped images were stamped with the Brilliant Blue Craft Ink from Stampin' Up, and heat embossed with clear Ranger embossing powder.

We hope he enjoys his card, AND gift card! He always writes wonderful Thank You notes to us.

~*~ ~*~ ~*~ *~ ~*~ ~*~ ~*~ ~*~ ~*~ ~*~ ~*~ ~*~ ~*~ ~*~ ~*~
A Proud member of The Lime Light. Click on over to see what we are doing.

Sunday, May 3, 2009

Post 6 of New "Old" Things - Altered Notebooks!


November/December 2008
These notebooks have some special meaning for my husband and me - we've traveled quite a bit and visit butterfly houses/exhibits whenever we can. I just find them so pretty!!

I used my Cuttlebug to cut and emboss these butterflies from one of their combo sets. I also used the DCWV stack; Butterflies and Blossoms.
I thought these would be nice and inspiring as a journal.

~*~ ~*~ ~*~ *~ ~*~ ~*~ ~*~ ~*~ ~*~ ~*~ ~*~ ~*~ ~*~ ~*~ ~*~
A Proud member of The Lime Light. Click on over to see what we are doing.

Post 5 of New "Old" Things - Altered Notebooks!


November/December 2008
These are more of the notebooks I sent for our Ronald McDonald project through the Lime Light Design Team.
The cartridges I used for these - Graphically Speaking (What an AWESOME cart!), Home Accents, and Accent Essentials mostly.
The flowers are from Hobby Lobby- a brand called Petaloo. They adhere nicely with the Zots and layer up with the sparkly centers very well.
I used Glossy Accents to make the popsickle from the Doodlecharms cart look more realistic. It took a long time to dry, but looked GREAT!!


~*~ ~*~ ~*~ *~ ~*~ ~*~ ~*~ ~*~ ~*~ ~*~ ~*~ ~*~ ~*~ ~*~ ~*~
A Proud member of The Lime Light. Click on over to see what we are doing.

Post 4 of New "Old" Things - Altered Notebooks!


November/December 2008
These altered notebooks were one of our Lime Light Design Team projects for the Ronald McDonald house. These are the Disney character notebooks...
The interesting thing with these notebooks is that I used the binding color to cover the inside raw edges from the cover paper. They looked GREAT!
I enjoyed these so much - I made Christmas gifts for the entire family using their own personal interests!


~*~ ~*~ ~*~ *~ ~*~ ~*~ ~*~ ~*~ ~*~ ~*~ ~*~ ~*~ ~*~ ~*~ ~*~
A Proud member of The Lime Light. Click on over to see what we are doing.